|
|
Docs | Gallery | Download | Blog |
A new set of animation features were added in PyDPainter 2.x.
Note : PyDPainter aims to implement all the animation features from the Amiga version of Deluxe Paint III. On this foundation, enhancements such as GIF support and multi-palette mode are being added to better support more modern formats.
An animation is a sequence of frames. Each frame is like an individual image on which you can draw independently. Animation is therefore the more or less rapid succession (see Control rate) of frames that produces an optical illusion of movement. In reality, nothing really moves. Think of it like the drawings on the bottom of a notebook that you flip through rapidly with your thumb. This is the same way that early cartoons were drawn. Because of this principle, animation has a few limitations (which are those of the Deluxe Paint era):
This loads an animation in the following formats:
Note that since the Amiga doesn't need the .anim file extension to recognize a file, you may come across ANIM files with no extension.
The Amiga's HAM mode (4096 simultaneous colors with constraints) is not and will not be supported, unless converted to 256 colors.
This button lets you create a directory without switching to your file manager. When you're working with a series of images, it's really handy!
PyDPainter allows you to save your animations in the following formats:
There's no such thing as a "work project", this saving only includes frames. So don't forget to save your draft page (j) as an image and the brushes you've used. in the Brush / Save as Menu.
The "move requester" is a powerful function that lets you move a brush throughout the animation, on the x, y and even z axes (perpective and rotation). It will be implemented in the near future.
PydPainter can also load a sequence of numbered images. For example:
myanim_001.png to myanim_200.png01.iff to 12.iffYou can, for example, load frame-by-frame renderings from other software, such as 3D or a series of scanned drawings.
PyDPainter can handle up to 9999 frames, but it can become very slow with that many frames.
Exports all frames of the animation as a numbered sequence of still images in the following formats:
It's best to export images into their own folder using the Make Dir button to avoid having hundreds of numbered files mixed in with others in a directory.
Sets the number of frames.
Ten frames may be enough for a test run. Remember that old cartoons use less than 15 frames per second.
Copies the drawing of the current frame to all other frames.
Adds one or several frames after the current frame. By doing so, it copies the contents of the frame currently displayed.
Delete this frame or several frame after the current frame. Please note that undo will not cancel this action.
Delete all frames, thus delete current animation and remove animation nav bar below.
Note that a navigation bar appears at the bottom of the screen whenever an animation is loaded or created. This "navbar" can be retracted using the F10 key.
Defines the number of frames per second. This is the speed of your animation. At the time, it was not uncommon to see game intro or animation at 12 or 15 frames per second, for reasons of disk or memory space. Remember, your work will be better appreciated if people have time to look at it.
This speed can be global (for the whole animation) or local (the animation can speed up, for example, or remain "paused").
Go back to the previous frame (if you're at frame 20, go back to 19).
Keys 1 or PageUp
Go to next frame (if you're at frame 20, go to 21).
Keys 2 or PageDown
Goes directly to the frame number you specify. If this number is greater than the total number of frames defined by Set #..., this just takes you to the last frame.
Key 3
Plays the animation in a loop. When it reaches the last frame, it starts again without interruption.
Key 4
Hit ESC or SPACE to stop.
Plays the animation once. Once it reaches the last frame, it stops.
Key 5
Play the animation in the normal direction (from the first to the last frame), then in the opposite direction, and start again.
Key 6
Brushes become animated in this powerful feature that lets you draw with an animation. When using an anim brush, each time it draws on the canvas, it automatically advances to the next frame in the anim brush.
Anim brushes can be used in two main ways:
In fact, an anim brush can be used just like a normal brush with any of the drawing tools: dot, freehand draw, line, rectangle, circle and even ellipse.
See the anim brush tutorial for some more ideas.
You can even combine anim brushes with anim painting for more possibilities. See the anim painting tutorial to see how anim painting works and try using an anim brush instead of the normal brush used in the tutorial.
Note that anim brushes support only one palette for the entire sequence of anim brush frames.
This loads an anim brush in the following formats:
If the loaded anim brush has a different color palette than the current picture, the colors can look strange. If you want to use the anim brush with the correct colors, you have some options:
Note that since the Amiga doesn't need the file extensions to recognize a file, you may come across ANIM or anim brush files with no extension.
PyDPainter allows you to save your anim brushes in the following formats:
Note: you must have a brush with more than one frame to save it as an anim brush. To save a brush with a single frame, use the Brush menu Save.
This menu option allows you to choose a rectangle area from each frame in an animation and creates an anim brush out of it.
Step-by-step operation:
Key alt-b
The Grab Grid menu option creates an anim brush from a series of cells in a grid that you select from the current picture. This could be a sprite sheet or a similar series of images in a single picture.
Hotkey: alt-g
Choosing the Animation/Anim Brush/Grab Grid... menu option brings up this requestor:
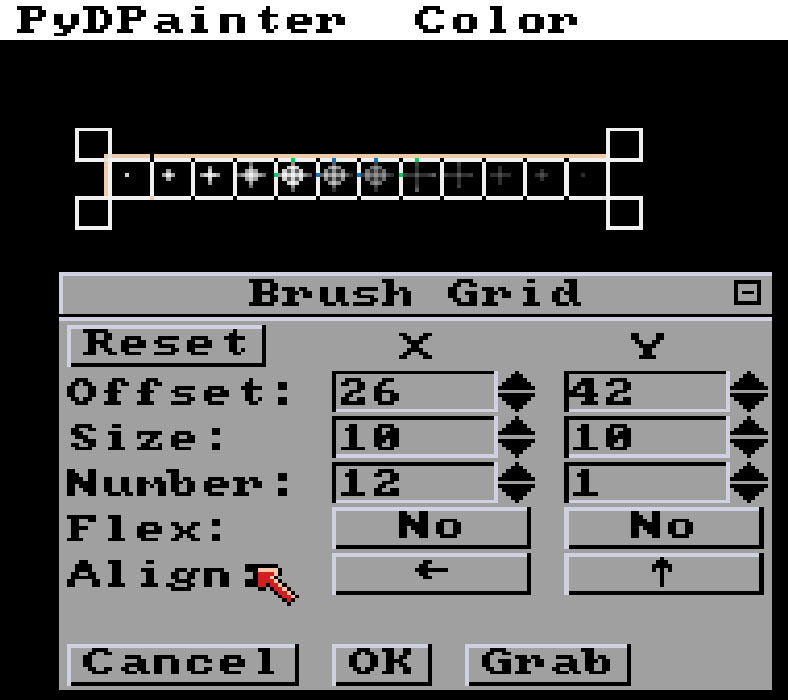
This requestor controls the grid of cells that will turn into an anim brush.
Tip: you can move the requestor if it obscures the area you need to work on. Inside the title bar, the [-] button also lets you collapse it.
Here are the settings you can control:
This button puts the brush grid back to a default setting in case you messed up and don't know how to get back.
The Offset setting lets you choose the X and Y pixel offset of the upper left of the grid. These coordinates are based on (0,0) being at the top left of the picture. Use the up/down spinner arrows to move the grid in the X or Y directions. You can also click and drag the brush grid to move it to a new position.
The Size setting specifies the width and height in pixels of each cell in the grid. Use the up/down spinner arrows to adjust the size of the cells. You can also resize the grid in any direction by dragging the corner handles or the handles that appear along the top, bottom, left, or right when you move the mouse over that area.
The Number setting lets you change the number of grid cells in the X and Y directions. Use the up/down spinner arrows to increase of decrease the number of cells horizontally or vertically. You can also just enter the number directly.
Clicking on the Flex option toggles the value between "No" and "Yes". With "No" flex, the grid is fixed to the size specified above for each of the cells. If flex is set to "Yes", PyDPainter uses the background color to attempt to find the edges of the image in a cell. It will show this as a dotted line on the screen. This can be used for sprite sheets that don't have consistent spacing between the cells.
Note: Make sure the background color is set properly to allow empty space to be detected properly.
Clicking on the Align arrows in the X direction cycle from left to right to centered. The Y direction cycles from top to bottom to centered. These alignments determine the position of the cell when it is smaller than the grid size because Flex in that direction was turned on.
The Settings requestor allows you change how the current anim brush behaves.
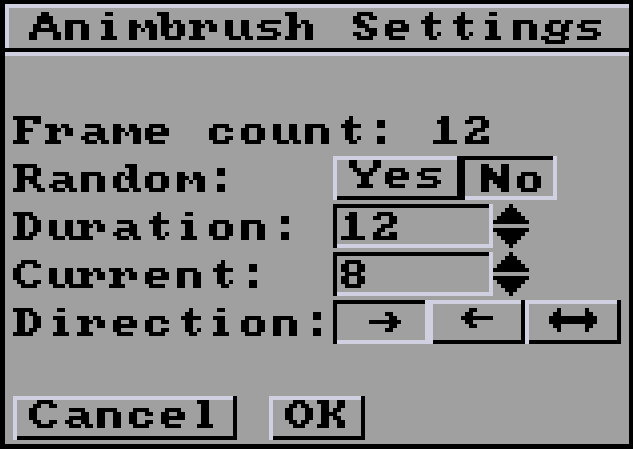
The Frame count is the number of frames in the current anim brush.
The default for Random is to be set to "No" which allows the anim brush frames to advance one at a time. Setting the Random option to "Yes" chooses a random frame from the anim brush each time it is drawn to the screen. Because the rest of the settings in the requestor make no sense if the value is set to "Yes" it ghosts the rest of the values.
The Duration value controls how quickly the frames of the anim brush advance. To change it, use the up/down arrows or type a number in the text field. If it is set to the same as the frame count, the anim brush changes one frame each time it is drawn. If the duration is less than the frame count, frames are skipped to match the duration. If the duration is more than the frame count, frames are duplicated to match the duration.
The Current value controls the number of the frame currently shown from the anim brush. To change it, use the up/down arrows or type a number in the text field.
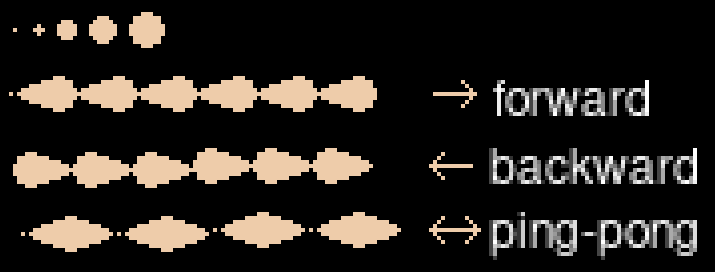
The Direction arrows allow you to choose the direction the anim brush frames are advanced: forward, backward, and ping-pong. The following example shows the frames of a circle airbrush with a line tool dragged from left to right in forward, backward, and ping-pong modes:
Previous moves the anim brush to the previous frame.
Key 7
Next moves the anim brush to the next frame.
Key 8