 PyDPainter
|
PyDPainter
|
Docs | Gallery | Download | Blog |
A brush is a rectangle of pixels grabbed from the screen, which can in turn be
used in all drawing tools, animation tools, or certain fill modes. To define a
brush, first click the Brush tool in the toolbar then drag a rectangle around
the desired area on screen. After releasing the mouse button, you will see the
brush follows the mouse cursor and you can draw with it on the screen. The
current background color (black by default) will be interpreted as a
transparent color.
Shows a file requestor to allow you to choose a file to load as a brush.
You can load these examples in docs/menus/src directory. Starting Earth
brush is original.png
Shows a file requestor to allow you to save current brush to a file as a brush. This is mostly used with iff/ilbm file types.
Restore the brush as you defined it the first time you grabbed or loaded it.

key: SHIFT-B
Use the mouse to freely resize the brush. Proportions will be lost.

key: SHIFT-Z
Reduces brush size by half, without any anti-aliasing.

key: h
Double brush size, without any anti-aliasing. This can help create a highly pixelated retro effect on text or graphics.

key: SHIFT H
Horizontally double the size of the brush.
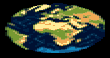
key: SHIFT-X
Vertically double the size of the brush.
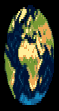
key: SHIFT-Y
Flips brush direction horizontally, right and left are reversed.

key: x
Reverse brush direction vertically, top and bottom are flipped.

key: y
Adds an outline of the foreground color. This operation can be repeated for a larger contour, including by changing the color.

key: o
Removes a one-pixel edge around the brush. If the brush has holes (background color is transparency) or irregularities inside, this will also alter them. If this operation is repeated, the brush will eventually be completely trimmed.


key: O
Turn the brush 90 degrees. If repeated, the brush will be rotated 180 then 270 degrees, and finally back to its original position.
Please note that this is not the same as FLIP X or Y. Very useful for adding
some variety using the same brush.


key: z
Use your mouse to rotate the brush freely.
 Use 23.4° for Earth 🙂
Slant the brush horizontally with the mouse. Think italics!


Changes one color to another in the brush. This makes everything that is the
current Background (BG) color into the current Foreground color (FG).
Carefully select each color in the toolbar before using this function.
 (orange has been changed to yellow)
Exchanges two colors in the brush. This is the current Background (BG) color
and the current Foreground color (FG). Carefully select each color in the
toolbar before using this function.
Try to remap, to approximate as closely as possible, the original brush
colors in the context of the new palette colors. This only makes sense if:
Changes the brush transparency from the current background color.
Note: if you want a brush with no transparency, just use Repl MODE (F3).

Only one color can be transparent. If you had transparent black and wanted orange to be transparent too, you couldn't. In this case, fill the orange with black before redefining your brush.
Deforms brush horizontally along a curve.

Deforms brush vertically along a curve.

Defines the handle point (shown as a crosshair). This point is used for all on-screen drawing and animation tools. It cannot "leave" the screen.
Defines the handle point in the center of the brush. It's by default.
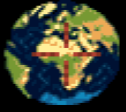
key: Alt-s
Sets the cross at a corner of the brush, starting with the top left corner.
If you repeat, the corner changes around the imaginary square that surrounds
the brush.


key: Alt-x
Drawing with a brush held by a corner allows you to draw close to the edges of the screen and change the behavior of drawing tools.
Use the mouse to freely define the brush's handle point.

key: Alt-z